16 Quick iPhone, iPad & iPod Touch Tips That Every User Should Know
Sometimes a quick reference guide to some tips and tricks to remember is all you need. So below are some quick tips of things to keep in mind or use. I’m using iOS 5 and therefore some of the things you may come across below won’t be the same as your device if you do not have iOS 5.
*Please note that throughout the steps below, you can click on the image to enlarge the photo, if needed.1. How To Take A Screenshot
You may or may not be wondering how I added the pictures of my screen on the iPhone and iPad when I did some of the other articles. It’s actually pretty easy and you will be surprised how useful this little trick comes in! I use it quite often.
So to take a screenshot on your iPhone, iPad or iPod Touch, all you need to do is the following:
Press your “Sleep / Wake” button and the “Home: button in together for 3 seconds.
If you are not sure what the “Sleep / Wake” button or “Home” button is, see the picture below:
Once you have pressed these two buttons in for the 3 seconds, you will see your screen go white and you will hear the sound that gets played when you take a photo too.
You can find the screenshot images in your “Camera Roll” album in “Photos.”
2. How To Do A “Hard Reset”
Doing a hard reset is sometimes needed when your iDevice becomes unresponsive or acts strangely. Recently my father asked me if I know what would cause his iPad 2 to become sluggish and slow. I asked suggested he do a “hard Reset” and the iPad was back to its usual self again.
To do a “Hard Reset,” you will be following the steps as mentioned above on how to take a screenshot. Hold in the “Sleep / Wake” button and “Home” button in until you see the Apple Logo displayed on-screen as if you’ve just switched the device on. From the moment you hold the two buttons is until the Apple Logo is displayed takes about 10 seconds. Once you see the Apple Logo, release the buttons.
Here is the Apple Logo I am speaking of:
Once this screen is displayed, the iDevice will now reboot and might as to enter you sim card pin
3. How To Lock Screen Orientation / How To Prevent The Screen from Rotating
Often times you may be sitting at an awkward angle or the screen will rotate to landscape instead of portrait when you’re using your iDevice, which can become rather irritating sometimes. Luckily there is an easy way to prevent this from happening and easy to access while using the phone for in case you want to have the screen rotate.
To lock the orientation of the screen, double tap the “Home Button” and you will notice the screen slide up and you will see possible running apps in a screen that looks something like:
Double tap the “Home Button” then slide over the open apps from left to right:
Here is the screen you will see when the Orientation is unlocked, tap on the icon to the far left that looks like an arrow showing a kind of circular motion:
Here is the screen you will see when the Orientation is locked, tap on the icon to the far left that looks like an arrow showing a kind of circular motion with a lock in the centre:
4. How To Quickly Access iPod Controls
Quickly want to play music on your iPod on your iPhone, iPad or iPod Touch without having to navigate to the app and then pressing play? No problaymo. There are two ways to do this. One way is from your “Home Screen” and the other from the “Lock Screen.”
From The Home Screen
From the “Home Screen” you will be following similar steps to locking or unlocking your Screen Orientation as shown above.
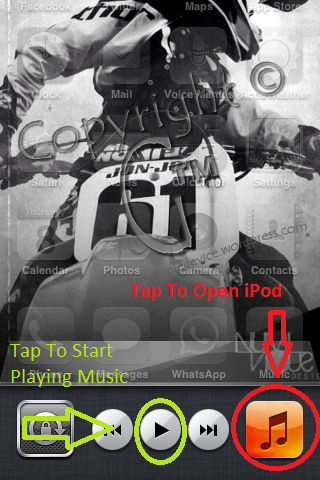
So to quickly start playing music, Double tap the “Home Button” then slide over the open apps from left to right:
Here you will see the screen orientation lock button as well as a the iPod Controls and iPod app icon. If you want to go into the iPod app, tap its icon, or tap on the play icon to play the music from where you left off, or from a random song if the iPod has not yet been closed and not used again since.
From The Lock Screen
Once Again this means double tapping the “Home Button,” so I’m sure you know what the home button is now?!?
On the lock screen, which will look something like this:
Double tap the “Home Button” without unlocking the phone and you will see the following screen:
To start playing music, tap on the play button to start playing music from where you left off, or from a random song if the iPod has not yet been closed and not used again since.
5. How To Quickly Access The Camera
Quick, there’s a guy about to fall down the stairs and you want to take a photo for Fail Blog! There’s an easy way to get to your camera in situations like this and others. Again the double tap home button move comes in.
Right, so on the “Lock Screen” as shown above for the iPod Access on the “Lock Screen”, double tap the “Home Button” and you will see the following screen:
Tap on the camera icon on the bottom right of the screen to open the camera.
6. How To Change The Sort Order of Notification Centre (iOS 5)
The default setting on iOS 5 for your Notifications Centre is to sort notifications by App. Here there are two things you could consider changing if you would like to.
To change the following settings, you will need to access the “Notifications” option in the ‘Settings” app. To get to the Notifications settings, open “Settings” from your “Home Screen” :
Next tap on “Notifications”:
Follow the following steps to change the order in which apps and notifications will be displayed:
Change The Order Of the Apps In Notification Centre
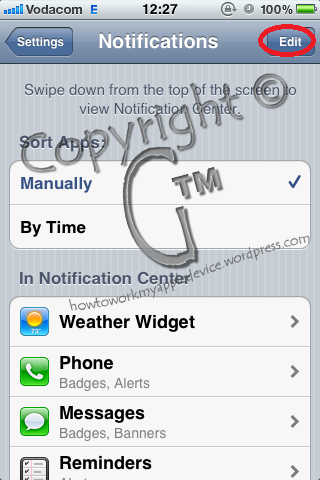
This settings applies to the order of the Notification Centre when the setting is set to “Manually” and not “By Time.”
Tap on “Edit” , which will be on the top right of the screen:
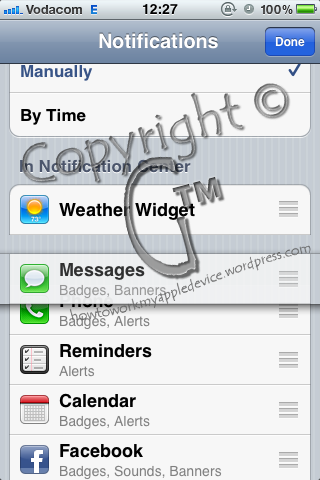
Once you’ve tapped on “Edit” you will notice the arrows to the right of each application change to 3 grey horizontal bars:
To change which apps you want to come first or their order, hold down on the grey bars and drag the app to the position you want it in:
Release the screen, and effectively the 3 grey bars to put the app in the new position:
After you have moved the app’s into the order you want, tap on “Done” to save the changes:
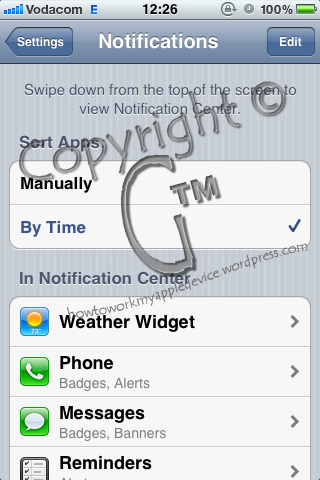
Next is the order and sorting I prefer to make use of as, for me, it is more practical. This is to set the “Sort Apps” to “By Time”, instead of “Manually”. This means that the most recent notifications will be on the top of the list and the others will follow according to the time in which they cam through.
7. How To Access “Notification Centre” (iOS 5)
This is a really basic step, but some may not be aware they can do this or they are not sure of how to access the “Notification Centre”. To Access The “Notification Centre”, hold your finger down on the top of the screen and drag down:
Once you start dragging downward, you will notice the “Notification Centre” appear:
Some great guys to follow on Twitter there on my “Notification Centre”: @QQLessPlz and @gidiskidi by the way…
Okay so the next tip is:
8. How To Quickly Scroll to the Top of Your Screen
This is a nice to know when you want to scroll back to the top of my screen when surfing the net on Safari, in Messages and many other apps.
Here, for example, is a note I made with ideas of things to do for How To Work My Apple Device:
Notice in the picture below I am at the top of the page:
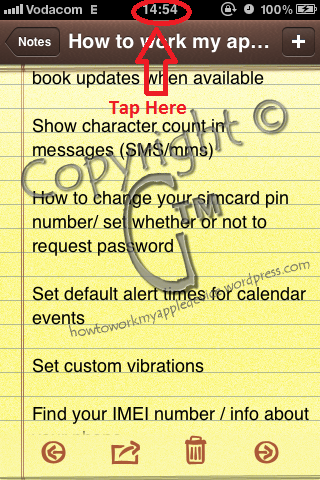
Now say I was scrolling through the note and then decided I want to scroll back to the top to add something in, all you do is tap on the top of the screen (more or less on the time) once to scroll back to the top:
This will scroll you back to the top of the screen:
9. How To Show The Character Count in Messages
This only applies to the “Messages” app and “iMessage”
From the Home Screen, tap on “Settings”:
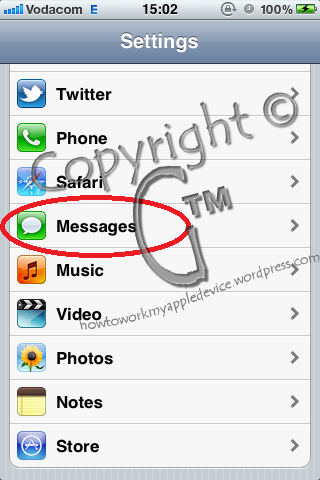
In the Settings, scroll down to where you see “Messages” and tap on it:
Once in Messages, make sure “Character Count” is switched on. If not, tap on the button that will say “Off” to turn it on:
10. How To Change Sim Card Pin / How To Turn Pin Request off
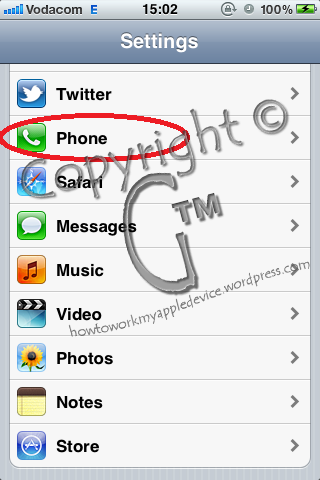
Open Settings and go to “Phone”
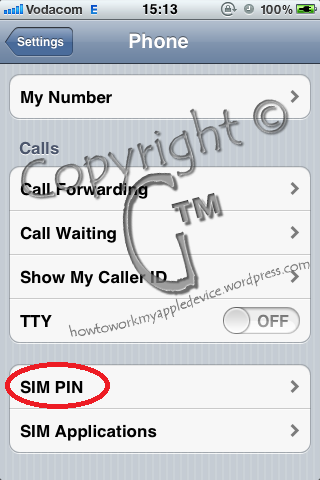
Next tap on “Sim Pin”:
On the next screen you can change the pin or switch off the pin request on iPhone or iPad WiFi + 3G start-up:
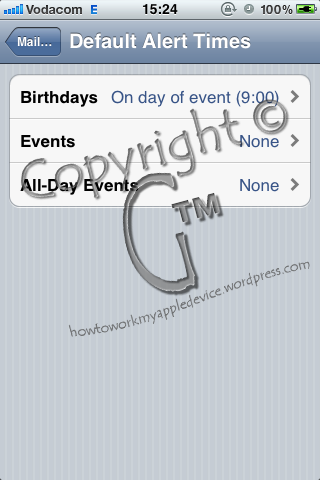
11. How To Set Default Alert Times For Calendar Notifications
Tap on Settings, then Tap on “Mail, Contacts, Calendars”:
Once in Mail, Contacts, Calendars, scroll to the bottom of the page and tap on “Default Alert Times”:
In the next screen you can set Default Alert Times:
12. How To Find your Device’s IMEI Number, Serial Number & Basic device Info
Go To Settings, tap On “General”
Next tap on “About”:
Below is the “About” screen of your device, here you can see some info about your iPhone, iPad or iPod Touch:
To view your IMEI number or serial number etc, scroll to the bottom pf the page and you will find it there. I have edited all my info out on the next page for security reasons 🙂
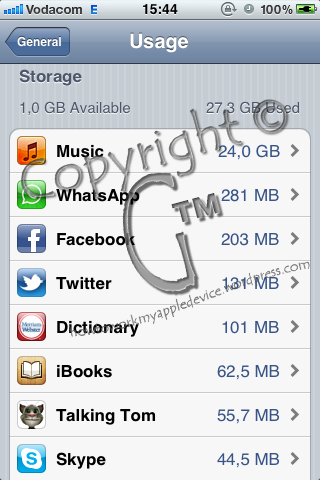
13. View Where Your Device’s Space is Being Used & Data Usage
Tap on “Settings”, then “General” then tap on “Usage”:
In the usage section you can view and manage where all space is going to and see how much data you’ve used:
While you’re on the “Usage” screen, you can also set to see your “Battery Percentage”…
14. Set To See Battery Percentage
To Set to see the battery percentage on or off, go to “Settings’, “General”, “Usage” and scroll down till you see the following:
15. How To Switch off the Predictive Text / Turn the Auto-Correct On or Off
I’m pretty sure you’re familiar with what the “Settings screen looks like, so I’ll add screenshots from where necessary.
From “Settings” tap on “General” and then scroll down to “Keyboards” and tap on it:
Next, tap on the “On” or “Off” icon next to “Auto Correct” to turn it on or off:
Also interesting to note here is the ” “. shortcut. If this is on, the device will automatically put in a full-stop when you double tap the space bar button, on the keyboard in a message.
16. How To Turn The Calculator Into A Scientific Calculator
First make sure the screen orientation is set to “Unlocked” as I showed you in Quick Tip 3.
Then From the Home Screen, tap on “Calculator”:
Here is the calculator as usual:
Then, while in the Calculator app, rotate the phone so that you holding it in Landscape and the calculator will rotate too and in the process become a scientific calculator:
I hope you have found this useful!
Keep an eye out for more iPhone, iPod Touch and iPad tips!
If you need anything further, please leave a comment on this post or see my contact page and I will do my best to help you.
Always remember, give a jackass an education and you’ll have a smartass!
Signing out.
G™



















No trackbacks yet.