How to Make an Apple ID on iPhone, iPod Touch or iPad
As promised When I made the guide on How to Make an Apple ID in iTunes, here is a guide on How To Make An Apple on Your iPhone, iPod Touch or iPad.
This is a FREE apple ID, meaning it will have no credit card details.
[UPDATE]: If you know how to make an apple ID, but not able to get the “None” option when it asks for your payment method, please see step 3 and 4.
For this you will need the following:
- An iPhone, iPod Touch or iPad
- Internet connection or WiFi connection
- An Email account that is not already registered with Apple
- A physical Address
If you don’t already have an email account, or you would like a separate email account, you can make a Gmail account, as I will do for the purpose of this tutorial. I have chosen to use a Gmail account, but you can use any email services you might have at your disposal. To make a Gmail, you can click here for the “Create An Account” page on Google.
*Please note that throughout the steps below, you can click on the image to enlarge the photo, if needed.Step 1
If you have an Apple ID already and you are making a new one, please make sure you have signed out of the account. To do this, please see step 1 – 4, under the “iPhone & iPod Touch Steps” section in “How To Switch Between Apple ID’s“, then return to your Home Screen.
From your Home Screen, tap on “App Store”
Step 2
If you want to make a “Free” account, make sure to select a free app once in the app store. If you can’t find a free app, the easiest way is to Tap on “Top 25.”
Step 3
Next tap on “Top Free”
Step 4
Choose any app under this free section or find something that catches your eye, then tap on it to start the download and thereby the create a new account process.
I decided to download the DSTV Mobile Guide iPhone App. Once you in the app, tap on “Free”
The “Free” button will turn green and become “Install.” tap on “Install”
Step 5
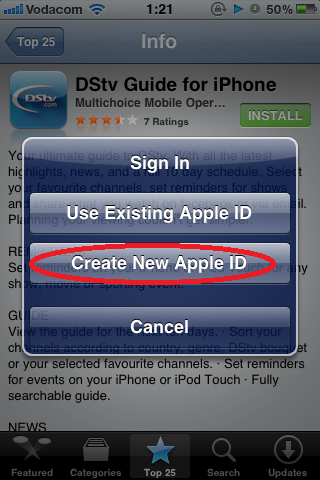
Next, the screen to either sign into an existing Apple ID or create a new one is displayed. Tap on “Create New Apple ID”:
Step 6
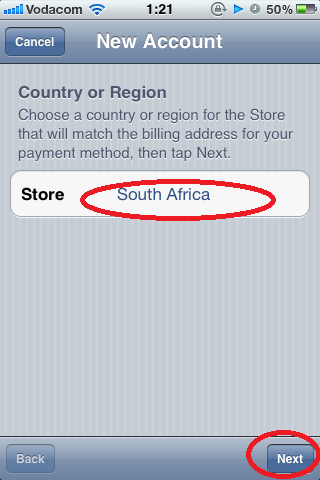
Next make sure that your country is displayed and tap on “Next”
Step 7
On the Next page is the Apple terms and conditions. You are more than welcome to read through these, but you can also just tap on “Agree.”
Tap on “Agree” again to accept the terms and conditions:
Step 8
Here is where you will fill in the account detail basics. Fill in the email account details you either have or the one you made for this Apple ID as I have. You can, however, use your own date of birth and security question. Also, you will need to fill in a password, at least 8 characters in length that contains a number, capital letter and doesn’t repeat the same letter 3 times after each other:
Once you’re done, tap on “Next”
Step 9
Once you have tapped“Next” in step 8, the next screen will be displayed. This is the billing information. Important to note here is that if you want to make a free account, you should select “None,” under the credit card info, which will be the very last option in the list.
The screen you will have in front of you will look something like this:
If you are going to create an account with your credit card details in, select the appropriate card type and complete the details as requested. As I am making a free account for the purposes of this exercise, I have selected “None” and the screen will change slightly and will look like the image below, notice how the section to fill in the credit card details is no longer there.
Step 10
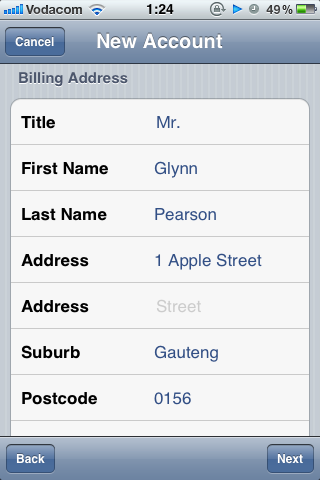
Once you have also completed the registration form, the completed page should look something like:
As I am in South Africa, I used some details for addresses locally. You may fill in your personal physical address, but I have entered the following address (Which I made up) in:
1 Apple Street Gauteng 0156 Centurion 0123456789You may use this address if you would like to.
After completing this, tap on “Next.”
Step 11
At this point, the following screen will be shown:
This is just to let you know they have sent the verification email to the email account you used, to confirm that an actual person made this Apple ID. Tap on “Done”. Tapping on “Done” will result in the screen closing and the App Store automatically opening again on the app that you initially selected to download.
If you want to ensure that Apple keeps your account, go to your email and verify your account. This can be done from the device or from your email. If you are not sure on how to do this, please see Step 10 & 11, under the iPhone, iPod Touch and iPad Steps section in the “How To Make An Apple ID in iTunes” guide.
Step 12
Next you can download the app you initially wanted to before the process of making an Apple ID. As the App store would have already opened, tap on “Free” on the top right corner of the screen, yet again:
The “Free” button will change to a green “Install” button. Tap on it:
Step 13
Once you have tapped on “Install” in the previous step, the following screen will come up:
Sign in with the Apple ID account details you just made. After you have filled in the details, tap on “OK”:
Step 14
The App Store will now close and the app you are now downloading will be placed on the first open space on any of your screens as shown below:
Carry on using the device, or wait for the app to finish downloading:-)
Enjoy and happy shopping!
I hope you have found this useful!
If you need anything further, please leave a comment on this post or see my contact page and I will do my best to help you.
Always remember, give a jackass an education and you’ll have a smartass!
Signing out.
G™


What of there is no “none” icon??
Hi Jena,
Then you need to begin the process over, making sure that you attempted to download a free app in the beginning of the entire process, BEFORE you carry on with the rest of the steps.
G™
what if you dont have top25
Hi Sandy,
Find any FREE app… The suggestion for the Top 25 was because it was the quickest way to show everyone that they need to find a free app to do the process correctly.
G™
Hey Glynn,
I did follow your advice on step 9. Sadly, when it comes to the billing method, there is no none button/option for me :
does this has something to do with where im staying or the gadget itself? im using iphone 3g. I did some research in youtube and it baffled me how those people with iphone can have the none button.
please help me. thx!
Hi Vithal,
You have to make sure you attempt to download a FREE app in the beginning of the process.
This method is not impacted by the device you are using. If you have not come right, try following the steps in my article on how to make a Free Apple ID from the PC. Then all you need to do is log into the Apple ID from your iPhone.
G™
At the very last it asks me enter code I tried country code and system replied not correct. What does it need?
Raja :
Why in my IPOD TOUCH don’t have none??in billing…??
Did you follow ALL the steps, including attempting to download an app right in the beginning of the process?
G™
its says a verification email has been sent but i try accessing the account but i cant logged into it at all the verify the account 😦
Go here https://appleid.apple.com/cgi-bin/WebObjects/MyAppleId.woa/, click on “Manage your Apple ID”. Sign into your newly made Apple ID and request a new verification email. Also, try checking your email’s spam/junk folder.
G™
what did mean this app requires a gyroscope
Hi Alex,
Which iPhone do you have?
iPhone 4 and toward have a built in gyroscope. This is like the accelerometer in the phone which picks up if you rotate the screen or not, but works slightly differently. The gyroscope picks up if you physically turn around in circles or oscillating motion.
My thinking says that your iPhone is possibly an iPhone 3GS and that model unfortunately doesn’t have a gyroscope built in.
G™
when i press free and green box appears and says install app after doing it ,it says this app requires ios5.what to do please
Hi Rotishma,
You need to update your device’s iOS version. Check which iOS version you have on your device by going to Settings, General, About. Then scroll down till you find “Version”. If this is not version 5 or higher, you will need to connect your device to your computer with iTunes open and update the iOS.
G™
How to create an Apple ID without a iTunes Card?
Hi,
When you say “iTunes Card”, are you referring to an iTunes gift card or a credit card?
G™
This is a wonderful way to download apple free app who don’t have credit cart.
Has apple taken the none option off?
HI,
Not that I know of. I used this method a week ago to make an Apple ID for a friend.
G™
Best
Hello,
when I put in my date of birth, it says I;mm too young, then I made on up and the year was in the early 1970’s, and still says I’m too young! Please help as Im unable to do anything with it right now!!;(
Hi,
You will have to start the process by creating a completely new email address.
G
i have apple id but i can not install anything
Does your device have any restrictions on it which do not allow app installations?
Check in settings > general > restrictions